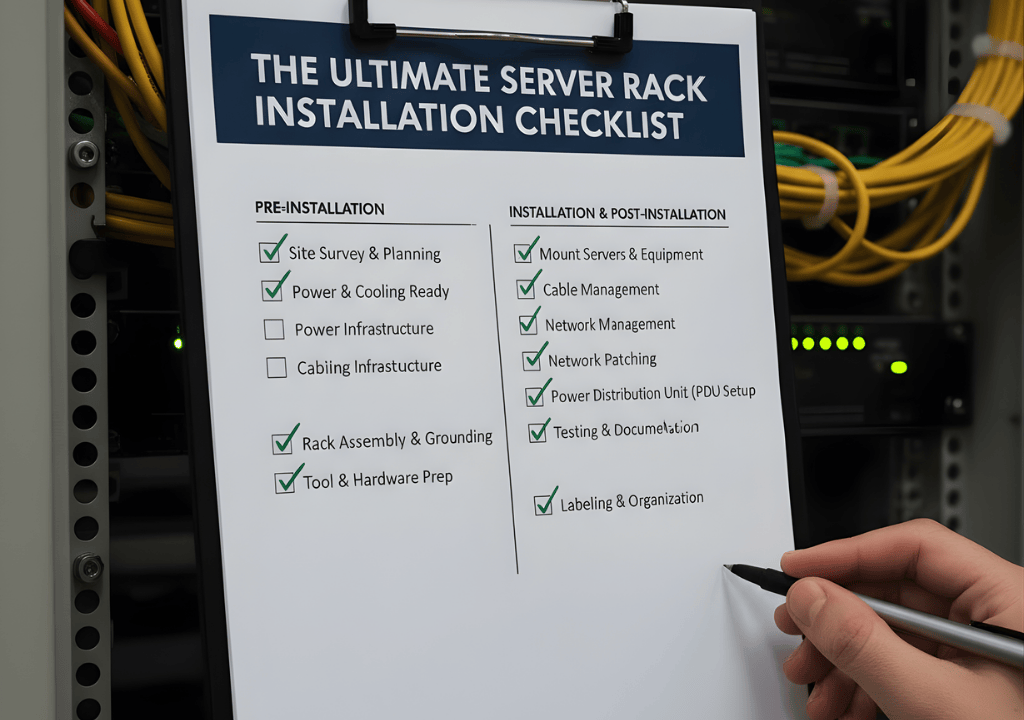
Installing a server rack is a critical infrastructure project that demands careful planning and precise execution. Whether you’re setting up a small business data center or expanding enterprise infrastructure, this comprehensive checklist ensures your installation meets industry standards while avoiding costly mistakes.
Pre-Installation Planning Phase
Before any equipment arrives, thorough planning sets the foundation for a successful server rack installation. This phase can make the difference between a seamless deployment and a problematic setup that requires expensive corrections.
Need server rack installation service Call us 01731605422
Assess Your Space Requirements
Start by evaluating your physical location. Measure ceiling height, floor space, and doorway dimensions to ensure your chosen rack can fit through entrances and position properly in its designated area. Standard server racks range from 22U to 32U in height, with each rack unit measuring 1.75 inches. Account for at least three feet of clearance on all sides for proper ventilation and maintenance access.
Consider the floor’s load-bearing capacity. A fully populated 42U rack can weigh between 2,000 to 3,000 pounds. Concrete floors typically handle this weight without reinforcement, but raised floors may require additional support structures or weight distribution plates.
Calculate Power Requirements
Power planning prevents overloaded circuits and unexpected downtime. Calculate the total wattage needed by adding up all equipment power consumption, then multiply by 1.25 to account for future expansion and safety margins. Most server racks require dedicated 208V or 240V circuits rather than standard 120V outlets.
Plan for redundant power sources. Install at least two separate power distribution units (PDUs) connected to different electrical circuits. This redundancy ensures that if one circuit fails, your critical systems remain operational. Consider uninterruptible power supply (UPS) systems for equipment that cannot tolerate any power interruption.
Equipment and Tools Checklist
Having the right tools and equipment ready eliminates installation delays and ensures professional results.
Essential Tools Required
You’ll need a comprehensive toolkit including Phillips and flathead screwdrivers, socket wrenches, cable management tools, a level, measuring tape, and a drill with masonry bits if mounting to concrete. Don’t forget safety equipment like gloves and safety glasses.
Specialized tools include a label maker for cable identification, a cable tester to verify network connections, and a digital multimeter for electrical verification. These investments pay dividends through faster troubleshooting and cleaner installations.
Hardware Components
Beyond the rack itself, gather cage nuts and screws compatible with your equipment, cable management accessories like vertical and horizontal cable organizers, rack shelves for non-rack-mountable equipment, and blanking panels to maintain proper airflow.
Physical Installation Steps
Step 1: Position and Secure the Rack
Place your rack in its final position, ensuring it’s level both front-to-back and side-to-side. Use a quality level to verify alignment, as even slight angles can cause equipment mounting issues. Once positioned, secure the rack to the floor using appropriate anchors for your floor type. Earthquake-prone regions require seismic bracing kits that meet local building codes.
Step 2: Install Power Distribution
Mount PDUs vertically on the rear posts or horizontally at the top or bottom of the rack. Connect PDUs to their respective electrical circuits, clearly labeling which circuit feeds each unit. Test each outlet with a circuit tester before connecting any equipment.
Install your UPS system if applicable, positioning it at the bottom of the rack due to its weight. Connect the UPS to both the electrical circuit and the PDU to ensure proper power conditioning and battery backup.
Step 3: Plan Equipment Layout
Strategic equipment placement optimizes cooling and accessibility. Position your heaviest equipment at the bottom to lower the center of gravity. Place frequently accessed equipment at comfortable heights between waist and eye level.
Separate heat-generating equipment with at least one rack unit of space, using blanking panels to maintain proper airflow patterns. Keep network switches and patch panels near the top for easier cable management and because they typically generate less heat than servers.
Cable Management Best Practices
Proper cable management isn’t just aesthetic—it directly impacts cooling efficiency, maintenance accessibility, and troubleshooting speed.
Network Cabling Strategy
Run network cables through vertical cable managers on both sides of the rack. Use short, appropriately-sized patch cables rather than excess length that creates tangled messes. Color-code cables by function: blue for management networks, yellow for production networks, red for storage networks.
Label both ends of every cable with source and destination information. This seemingly tedious task saves hours during troubleshooting and prevents accidental disconnections during maintenance.
Power Cable Organization
Keep power cables separate from network cables to prevent electromagnetic interference. Run power cables through the opposite side of the rack from data cables when possible. Use velcro straps instead of zip ties for bundling cables, as velcro allows easier additions and changes without cutting and replacing ties.
Cooling and Airflow Optimization
Inadequate cooling causes premature hardware failure and system instability. Implement these strategies to maintain optimal operating temperatures.
Establish Hot Aisle/Cold Aisle Configuration
Position rack fronts facing the cold aisle where cool air enters equipment. Equipment exhausts hot air from the rear into the hot aisle. This separation prevents hot exhaust from recirculating into equipment intakes, dramatically improving cooling efficiency.
Install blanking panels in all unused rack spaces. Even small gaps disrupt airflow patterns, causing hot spots and forcing cooling systems to work harder. Blanking panels cost little but provide significant cooling benefits.
Monitor Temperature and Humidity
Install environmental sensors at top, middle, and bottom positions within the rack. Temperature variations indicate airflow problems that need addressing. Maintain server inlet temperatures between 64°F and 80°F (18°C to 27°C) with relative humidity between 40% and 60%.
Final Testing and Documentation
Conduct Comprehensive System Tests
Power up equipment in stages, starting with network infrastructure, then storage systems, and finally servers. This sequenced approach prevents power surges and allows each system layer to initialize properly before dependent systems start.
Test all network connections, verify remote management interfaces respond correctly, and confirm monitoring systems report accurate data. Run stress tests on critical systems to ensure they operate reliably under load.
Create Installation Documentation
Document your rack layout with a clear diagram showing equipment positions, cable routing, power circuits, and network connections. Include equipment serial numbers, warranty information, and support contact details.
Photograph your installation from multiple angles, capturing cable management details and rear connections. These photos prove invaluable during remote troubleshooting or when planning future modifications.
Ongoing Maintenance Considerations
Schedule quarterly inspections to check cable connections, verify cooling system operation, and remove accumulated dust. Review and update documentation whenever changes occur. Plan capacity reviews annually to ensure your infrastructure can support business growth.
By following this comprehensive checklist, you’ll create a professional server rack installation that delivers reliable performance while simplifying future maintenance and expansion. Proper planning and attention to detail during installation prevent problems that would be difficult and expensive to correct later.